
Products You May Like

You can view all the past articles on the links below. Chris has now also brought out his new Safety and Rescue Essentials manual that can be downloaded or purchased from www.chrisbraincoaching.com
No.1: Safety series: be prepared and stay safe:
https://thepaddlermag.com/be-prepared-and-stay-safe/
No.2: working as a team on the water:
https://thepaddlermag.com/safety-series-no-2-working-as-a-team-on-the-water/
No.3: swim, chase, throw:
https://thepaddlermag.com/chris-brain-coaching-swim-chase-throw/
No. 4: get the advantage
https://thepaddlermag.com/chris-brain-safety-series-no-4-get-the-advantage
No. 5: What if…
https://thepaddlermag.com/chris-brain-safety-series-no-5-what-if-2
No. 6: the chest harness
https://thepaddlermag.com/chest-harness/
In the seventh part of the paddler safety series we will be looking at adding a few more options to your rescue skills tool bag.
It is important to remember that there is no substitute for professional training in this area and this must be combined with experience to effectively use the ideas and techniques contained in this series. This article is not intended to replace formal training. Our previous articles have focused on preparation, simple rescues, working together on the river and above all avoiding incidents happening in the first place. The techniques covered in this article assume that you have read the previous chapters.
Shouting
Before we go any further let’s go back to the basics! Whenever we are rescuing on the river we should be communicating clearly and effectively with our swimmer to assist with them rescuing themselves, this is commonly known as a shouting rescue. What we need to do when we are “shouting” at our swimmer is to give them loud, clear and easy to understand signals and instructions that will help them get to safety quicker. One of the great things about this kind of rescue is that there is no physical contact between the swimmer and the rescuer meaning that this is certainly our lowest risk option as a rescuer. We should also be combining this rescue technique with all our other techniques too, with clear communication being priority during any rescue.
Is there really that much to a shouting rescue?
Like any rescue technique, performing it effectively is critical to its success and there is a bit more to it than relentlessly screaming at our swimmer.
Anyone who has ever had a swim in whitewater will know how disorienting it can be and how much harder it can be to hear someone trying to give you instructions. Therefore, it is essential that we keep anything we shout very clear, simple and understandable.
Firstly, we need to grab the attention of our swimmer (using their name is helpful here) and then give them simple instructions such as, “Swim to me” and/or “Swim this way” (pointing where you want them to go). Depending on the experience of the swimmer you might need to tell them to get on their back, keep their feet up and to give them some real encouragement when it comes to swimming on their front to get to the side.
Taking on board audible instructions can be difficult in moving water, so must make sure that we give visual signals with our bodies too. Once we have attracted their attention (potentially by waving our arms and shouting) we should then be pointing our swimmer towards where we want them to go (rather than pointing at a hazard). Doing this as clearly as possible will really help and we should repeat any signal and pointing to make sure that they have seen it. If we want the swimmer to move quickly we can demonstrate some real urgency with our signals by repeating it more vigorously.
Reaching
Have you ever had that swim where you can get yourself to the side, but you just can’t get into an eddy or stop your momentum so you can get out? Wouldn’t it have been ideal if someone could have just passed you a pole to help you stop and get out? Fortunately most kayakers and canoeists carry something just for this purpose every single time we get on the river….our paddle!

Point where you want your swimmer to go
Yes, this rescue does have its limitations, being only as long as the paddle/pole/branch that we might be using, but if we have been giving our swimmer instructions using our shouting rescue techniques then this might be all they need to swing them into an eddy to get out of the river. It also meets our requirements of being easily releasable, because at any point if we can’t hold the force the swimmer is giving us, we can of course let go making it a lower risk rescue option.

The swimmer heads for the paddle
How?
The first thing we need to do is to attract our swimmer’s attention, using our shouting techniques. We can show them the paddle and make it clear to them that we intend to rescue them using this method.
As our swimmer heads towards us to start to reach for the paddle, it is the norm that they will start to roll onto their front to make it easier to grab. At this point our stance and positioning is critical, get it right we are solid, get it wrong and we will get pulled off our feet.
We need to get our body low down to the ground, adopting a strong and balanced squatted position. Our feet are wide apart to make us more stable and if we stay on our feet we can move our position if required. As the swimmer starts to grab hold of the paddle shaft we must make sure that our body is already angled towards where we want them to end up. When the swimmer grabs hold, their weight will be on the paddle and because of the momentum they have generated from the river (and the fact they are still in the flow) they will start to swing towards the eddy/side. At this point our body and our feet must be pointed at the place that we are trying to get them to otherwise we will be off-balance.
Once they have come to a stop they can use the paddle to assist in climbing up and out of the river, making it easier for them to get to safety.

The rescuer is ready in a strong low stance
A few extra tips
It doesn’t just have to be a paddle that can be used for this kind of rescue, a canoeist might use their pole or we could even use a tree branch if appropriate. We can also potentially use our sling that we are carrying in our PFD for a short rescue too. Using the sling for this purpose does cross over a bit into throwbag techniques, but due to its short length, with a bit of practice it can be used to great effect in this situation in a style that bridges the gap between throwing and reaching.
Don’t forget that another paddler could back you up when you are doing this rescue, making it easier for you to hold the load and helping you to stay on your feet. These techniques have been covered in an article in a previous article, but it could be anything as simple as holding PFD shoulder straps through to clipping into a chest harness and giving support that way.

When the swimmer grabs hold, they are swung into the eddy
Wading
Sometimes, simple methods are all that is needed for an effective rescue and to the nature of the river, it might be preferable to enter the water on foot. Remember that whenever we enter the water as part of our rescue, it is potentially high risk, however with a good understanding of the environment and the techniques involved we should be able to do this in a controlled manner.
Why?
Working out why you might decide to wade is very important. Wading can be used either directly as a rescue method or to assist with another part of a bigger rescue. Reasons you might wade could be:
- Recovering stranded equipment
- Clipping a throwline to a pinned boat
- Getting yourself back to the bank across shallow water after a swim
- Assisting another paddler back to the bank
- Accessing someone who is trapped or injured
- Getting out of the river after an incident

A rescuer backed up by another paddler during a reaching rescue
When it comes to going into the water on foot we have two options, solo or with a team. With both options, there can be no ‘safe’ depth that we can wade to, as we could have slow-moving knee deep water that feels easy, or very fast ankle-deep water that can knock us off our feet. Of course, once we get to a certain depth (usually near our waist) we will start to float and keeping our weight on our feet can prove to be exceptionally difficult. Only experience and practice will help you to judge these conditions when deciding how deep you can safely wade to.
Solo (the tripod)
Facing upstream so that we can lean into the flow as required we take a strong shoulder width stance with our feet and use our paddle out in front of us to create a solid tripod. One common mistake here is that people think their paddle is just a walking stick and just hold it rather than lean on it. Try and share your weight across both your feet and the paddle equally and in practice this means that we lean on the paddle quite a lot for support.
From this point, we can move one point at a time using the others to ensure that we keep our balance and our position. There is no hard and fast rule about whether we move our feet first and then our paddle or the other way around. I tend to find that the riverbed, the speed of the water and the path to our intended goal will help me decide which part of my body I move next. One thing that is important though, is that we don’t step one foot over the other. It might feel like we could move quicker by doing this, but we quickly lose the balance we had from our tripod and it’s only a matter of time before we are knocked off our feet.

Solo wading (the tripod)
When using the paddle, I find it is best to have the blade facing towards your body to allow the flow to help it pin into the floor. To move the paddle I keep the blade submerged in the water and change the angle so that I can slice it back against the flow before twisting it again to pin it back into the ground. Keeping the blade in the water like this minimises the instability that removing the blade from the water would create. It also means that you can move the paddle in small increments and lean back on it easily whenever you need more support.
Team
Wading as a team could be preferable to going in solo for a range of reasons. Firstly, you have other people helping to hold you in place and giving you support where you need it. You can also be tactical with your positioning and place the lighter/smaller members of the team in positions behind bigger people so that they don’t have to take as much force from the flow. It also might make it easier to recover an injured paddler or equipment as there will be more hands to assist in the recovery.
For any rescue involving a team, good communication is essential and wading is no different. There are two main options when wading as a team, the ‘line’ and the ‘V’.
The line
A simple method which essentially involves all the paddlers standing in a line in an eddy (or slower piece of water) created by the person stood at the front. In this technique only the person at the front has a paddle and uses the same “tripod” style that they would do if going solo. It is probably best if we have our heaviest/tallest paddler positioned at the front as they will get the most force from the flow. The bigger they are the better the eddy they will create for everyone behind too! With the rest of the team holding on to the person in front using their PFD shoulder straps, the team move out into the flow together, keeping the line facing upstream and staying in the eddy created by the front rescuer.
It is also helpful to have your second biggest/tallest paddler positioned at the back of the line as they will be able to keep the person in front in position and they won’t have anyone holding them behind ether.
Team wading (the line)
When using this technique, you need to be aware of when the everyone is moving and it relies on the team moving together. There is a tendency with this technique for the line to “snake” meaning that the team can be exposed to flow from the side. However, it is quick and easy to set up and is very simple to understand and use. This technique can become clumsy with too many people, if you are doing this with more than five or six people, consider creating more than one line and moving as two separate units.
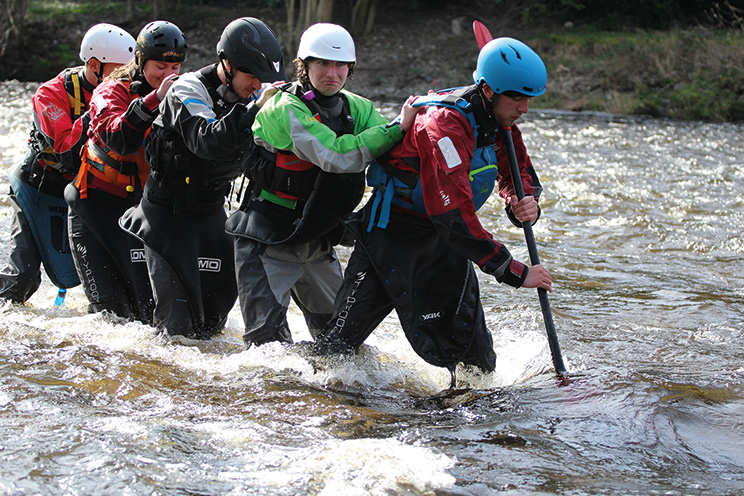
The V
With this method, rather than set up a single line, the team create a ‘V’ using two separate lines behind the front rescuer. This does mean that the rescuers from the team have a bit more force from the flow on their legs, but it isn’t as clumsy as the single line and it does create a bigger eddy as it spreads the flow around a wider area. There is also the option for the rescuers to have one hand on the person in front and one hand to the person at the side which can create even more stability.

Team wading (the V)
This technique could be used for recovering an injured paddler who might not be able to wade across on their own effectively. The injured paddler could lay on their back with their feet downstream and their body in the centre of the eddy created by the ‘V’. The injured paddler would be able to float in the eddy and would be held and positioned using their shoulder straps by a rescuer on either side of the ‘V’.
Remember
When we are wading, we should keep our end goal in mind and aim to assess the best path to get there. This might not mean moving directly sideways, but it could be moving upstream on a diagonal as it might be preferable to do this due to the strength of the flow or the features in the water. We could also be quite tactical with our approach too and aim to use slower parts of the water or even to use the natural eddies that the river might have behind boulders and features to make it easier to cross. As with any rescue technique, wading requires skill, judgement and experience to know when to use it and to perform it effectively. Next time you are out on the water try practicing some of these techniques with your team so you will be able to organise yourselves quickly should you ever need to do this for real.
Acknowledgements

Chris Brain
Chris has been kayaking, canoeing and coaching for the last 15 years and runs his own business Chris Brain Coaching, delivering paddlesport coaching, safety and rescue courses and REC First Aid Training. http://www.chrisbraincoaching.com. Email: chris@chrisbraincoaching.com
Chris would like to thank Pyranha Kayaks, Palm Equipment, VE Paddles and Go Kayaking for making fantastic kit and their continued support. Photo: Patrick Beavis