
Products You May Like
Get full access to Outside Learn, our online education hub featuring in-depth fitness, nutrition, and adventure courses and more than 2,000 instructional videos when you sign up for Outside+
Sign up for Outside+ today.
Backpackers have always been handy—it’s how we improvise repairs on the trail, modify gear for our specific needs, and make a backcountry campsite feel like home. Over the years, we’ve published all kinds of do-it-yourself projects for everything from recipes to survival equipment to backcountry ankle braces. These three projects come from deep within the Backpacker archive, taking us back to our camp craft roots.
Make & Fix It: Sew Your Own Ditty Bag
From Spring 1973
Making your own backpacking equipment is fun. It’s also the one sure way to acquire gear that fits your body and its needs. Everybody, with or without previous sewing experience, can make stuffsacks, small packs, and ponchos by machine or by hand. (Jackets and sleeping bags are not beginning projects, but once you’ve had some experience on smaller items, they’ll certainly be a possibility—especially if you use one of the simplified pre-cut kits available.) Like backpacking, sewing stresses individual resourcefulness and self-sufficiency. For those who have more time than money, sew-it-yourself is the answer for quality gear at moderate prices. It also prepares you for coping with emergencies on the trail. If the mountain men could do it, you can too.
Books
You should start with a basic sewing book, such as those published by the pattern companies for about $1 (the McCall’s Book is fantastic). Also, Cunningham and Hansson’s Light Weight Camping Equipment and How To Make It, a paperback loaded with background information, how-tos, and patterns. (However, some of the information on fabrics, zippers and threads is somewhat out of date.) This book, along with the fabrics and accessories needed for your first projects, is available by mail from most of the better known equipment suppliers. Your local camping store may carry it, too.
Fabrics
Because it provides the most strength for its weight, nylon is the most commonly used fabric in making backpacking equipment. Since it doesn’t rot, it will retain its strength much longer than cotton. In general, weight is an indicator of the relative strength of a fabric and is measured in ounces per square yard. Two weaves of lightweight nylon—ripstop and taffeta—are used in making ditty bags, wind jackets, down gear, ponchos, and tents. Ripstop nylon, the lightest (weighing approximately 2 ounces per square yard) is interwoven with a heavier thread every 1/4-inch, creating a characteristic crosshatched or checkered design. This interweaving of the stronger thread makes ripstop tear-resistant. However, it is more vulnerable to abrasions that the heavier nylon taffeta. Taffeta comes in weights from 2.5 to 3.5 ounces. Both ripstop and taffeta are available with urethane coating, which waterproofs them at the expense of breathability. Uncoated nylon, which does breathe well, is only water repellent. Since both weights of nylon are alike in general durability, windproofness, and water repellency, choose the lighter ripstop if weight is the primary consideration and the heavier taffeta if you’re concerned about abrasion resistance.
An even heavier nylon fabric, pack cloth, is used for packs, stuffsacks, gaiters and other equipment subject to extreme wear. Urethane-coated pack cloth comes in weights varying from 5 to 9 ounces, with 7.8 ounces being the most popular. Some suppliers identify the fabric by its weave (duck, oxford, etc.) but weight is the best criterion. As a rule, try to select the lightest fabric suitable for your specific purpose. Rock-climbing gear, for instance, will last longer if you use fabric 8 ounces or heavier. Day packs, on the other hand, can be made of 5 to 6 ounces of cloth.
Thread
The best all-round thread is Coats & Clark’s Dual Duty. It’s strong, resilient, and durable, combining the advantages of a synthetic polyester core (strength, elasticity) with a natural cotton exterior. (The cotton increases the waterproofing by swelling when wet to fill the holes formed by the needle.) Dual Duty is much easier to sew with than the all-nylon thread sometimes recommended and is suitable for hand or machine stitching. It’s available at many local sewing departments in a rainbow of colors.
Needles
Hand sewing requires needles of appropriate thickness and a thimble which fits the middle finger of the hand holding the needle. Sharps are the basic hand needles and come in sizes from #1 (fat) to #10 (slender). A package of assorted sharps (usually #3 through #9) will be suitable for most handwork. It you have trouble threading a needle, get crewel needles instead of sharps, or buy the handy little needle-threading gadget sold at sewing departments. Heavy canvas and awkward repairs may call for a package of household needles, including curved and carpet needles.
To determine the correct needle size, try out a few test stitches on the particular fabric to be used. A needle which is hard to push through is too big, while one that bends or breaks is too thin. Use the sides of the thimble (rather than the tip) to push the needle through.
After selecting and threading the needle, make a knot by winding the two cut ends twice around the tip of your first finger. Then, with your thumb, roll the loops off the finger and pull down on the thread to form a tidy knot.
Stitches
Two hand stitches are important for sewing gear. The back stitch, the basic construction stitch for sewing seams, looks like a machine stitch from the top, but the stitches overlap underneath. The overcast stitch is used to bind over raw edges and to sew on patches. With both stitches it’s important to begin with a firm knot, to space the stitches evenly, and to end by taking three or four stitches in the same place.
Seams
Several basic seams are found in backpacking equipment, and all can be done by hand or machine. Use pins or Scotch tape to hold the layers of fabric together prior to stitching. Uncoated nylon doesn’t have a “right” or “wrong” side, but when you sew with it, use one side or the other uniformly. Urethane-coated nylon is said to have a “right” side (the uncoated, shiny exterior side) and a “wrong” side (the coated, dull side), which faces inside.
The plain seam (the simplest) is formed by matching the edges to be sewn with “right” (uncoated) sides together. Stitch together ½ inch and then ⅜ inch from the raw edges. To avoid bulk you may trim off ⅛ to ¼ inches from the edge after stitching.
For the hem seam, match raw edges, fold in together about ⅜ inches and stitch through all four layers at once.
The flat fell seam is the one used on jeans, but inside out to minimize stitching on the outside. Begin as in the plain seam and stitch once to ½ inch. Fold the ½ inch twice, covering the raw edges, and stitch the fold down. On heavier fabrics, trim the underlayer to ¼ inch before folding or fold only once before stitching. The doublefolded flat fell seam is excellent for uncoated nylon, which tends to fray. If water repellency is important, use the hem or flat fell seam and then coat it with a seam sealer designed for urethane-coated fabrics. (Note: If you become at all serious about sewing, then you’re going to eventually want a machine. It’s easier, faster, and in the long run, more satisfying. But since most novices are wary of the sewing machine, I’m confining this column to techniques and projects sewable by hand.)
The Ditty Bag
A good first project is the ditty bag, a relatively small drawstring sack of lightweight nylon which separates items within a pack. It’s good for keeping small items together, protecting down gear, isolating dirty clothes, or segregating food rations by the meal or day. Much stronger than a plastic bag, the ditty bag weighs very little. It can be made of uncoated fabric, but waterproof ripstop or taffeta is best for general use. The bag can be labeled with an indelible felt marker.
The following instructions will produce a 10-by-12-inch ditty bag. However, after completing one or two, you can easily alter the proportions to suit your wishes.
Supplies Needed
- ¾ yard lightweight coated nylon
- Dual Duty thread
- 30-inch thin nylon cord for drawstring
- Spring action cord grip (if you want one)
Equipment Required
- Flat surface for cutting out the fabric
- Yardstick
- Shears
- Pen or pencil
- Needles and thimble (or a sewing machine)
Instructions
- Lay out the fabric with the “wrong” (coated) side up and measure off 26 inches on the length and 11 inches on the width.
- Rule off with yardstick and pen and cut out on the line.
- Fold with “right” (uncoated) sides together to form a 13-by-11-inch rectangle.
- Using the plain seam, stitch one of the 13-inch sides together, then the other, stopping 1 ¾ inches from the top to allow for a drawstring (this will form the casing).

- Turn the bag “right” side out. Fold in the raw edge on each side of the 1 ¾ inches opening and stitch.
- Place the drawstring 1 inch down from the top edge and fold fabric over the cord. Fold ¼ inch inside on the raw edge and stitch all around the ditty bag in one continuous seam. (It’s important to keep the drawstring away from the stitching line to avoid catching it in the stitches.)
- Attach the cord gripper (if desired). Melt and knot the cord ends. Your ditty bag is finished.

Stuffsack
With a few modifications, the same procedures will produce a stuffsack—that three-dimensional bag made of pack cloth used to carry a sleeping bag or other gear on the outside of the backpack.
Supplies and equipment are identical as for the ditty bag except for two substitutions: 1 yard of 45-inch nylon pack cloth and a yard of drawcord.
Instructions
- Measure 15 inches on the length and cut across 45 inches.
- Cut out an 8 inches square for a flap; turn it in ½ inch on three sides and stitch. (The flap is used to cover the opening when the sack is stuffed with a sleeping bag.)
- Use the plain seam or the hem seam for the sides. As you approach the 1 ¾ inches mark on the second side, fold a piece of webbing or fabric over the seam and stitch through all layers (this reinforces a stress area).
- To give the stuffsack shape, stitch about 7 inches across the base of each side. (Don’t cut off the “wings.”)
- When stitching the drawstring casing, tuck the unhemmed side of the flap inside and stitch all at once. Finish the same way as the ditty bag.
—Honey C. Hastings
Make a Backpacker’s Bakery
From January 1985
Fresh, hot bread along the trail is as easy as folding some foil.
You’ve been out on the trail for several days, and like an emerald mirage, a mountain cirque lake now appears below the ridge. You plan to spend some extra time by its shore, just day hiking…maybe fishing a little. It’s a rare morning on this layover day. There is no hurry for breakfast—no hurry for anything, really. You managed to fill a small plastic bag with wild huckleberries on the previous afternoon’s hike over the ridge. How would coffee and hot berry muffins sound for breakfast? No, these are not the hallucinations of a bushwhacked wilderness wanderer. Real treats like this are available, for very little trouble, to anyone who is willing to invest about $0.25 in a tiny homemade oven. The oven weighs only 5 ounces, and is not much bigger than a Svea stove. Less than $3 will buy enough canned heat fuel for several delightful recipes, with the weight equivalent to a cup of white gas. [Ed note: These prices are from 1985.]
There are some sound reasons for using a “Backpacker’s Bakery.” With the wave of one-step cake mixes, your grocer’s shelves are loaded with possibilities. Let’s use the Betty Crocker Snackin’ Cake as an example: All it requires is a cup of water, a spoon, and a small pan. (A nesting pot lid could be used.) One box weighs 13.5 ounces, and provides 1620 calories, at a cost of about $1.25. Serving two, this would provide over 800 calories and cost about $1 per person including fuel. These calories are mostly carbohydrates, entirely delicious, and are just the ticket for morning body fuel. Protein from cheese, jerky, or some other ready source will round out the meal nicely. For the extended trip, these morning meals can break up the instant oatmeal routine, and make a morning meal something to look forward to.
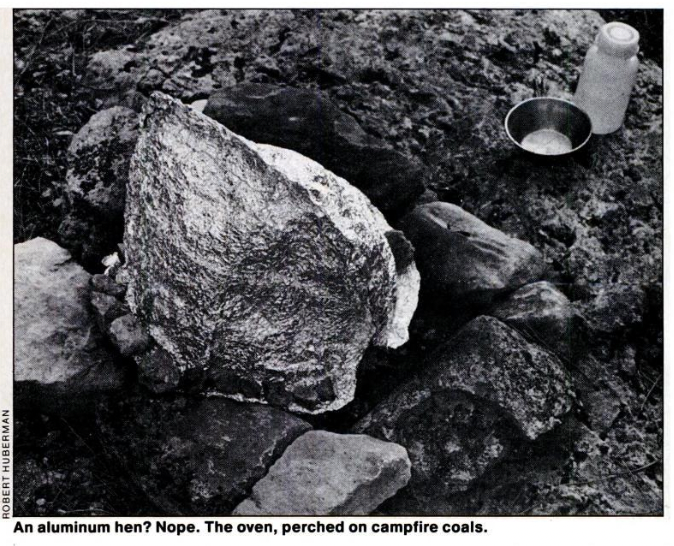
Making the oven is quite simple. First, find an empty, one pound coffee can. You will also need a roll of heavy gauge aluminum foil, such as Heavy Duty Reynolds Wrap. This product comes in an 18-inch wide roll. Tear off two 24-inch long by 18-inch wide pieces of foil, and lay them one on top of the other. Fold and crimp along one of the long edges. Continue rolling and crimping around the corner, down along the two 18″ sides, rounding the corners to form a half circle. It should resemble a flattened wool watch cap. Fold a 2-inch lip upwards all around the bottom of the “cap,” to form a narrow brim. Spread the two sheets apart and mold into a dome shape. If it resembles a rumpled, oversized Spanish conquistador’s helmet from some third grade school play, then you did it right. A foil heat deflector is needed to disperse the direct heat from the flame. Just tear off another 24-inch sheet of foil, and fold it into fourths—about the size of 8.5-by-11-inch sheet of paper.
To store the dome, gently fold it down to a 5-inch width and roll it up like a cinnamon roll, just tight enough to fit inside the coffee can. Fold the heat deflector down to a convenient size, and store the whole outfit in a small stuffsack.
Using the oven is as simple as making it. Find a flat, level piece of ground or rock, and brush aside twigs or flammable debris. Place the cake pan on the coffee an pedestal, with the heat deflector sandwiched in between. Be sure to drape the edges of the deflector downward, so it can disperse the heat and allow a buffer zone between the flame and the bottom of the pan. Next, place a Sterno can or small alcohol stove next to the coffee can. Light the burner and place the dome down over the whole setup. Place a few pebbles along the brim at the base of the dome to secure it to the ground. Allow small air vent gaps along the two seams. These should be large enough to provide oxygen, but not enough to let wind in. (The Sterno flame does blow out easily.)
You can check to see if the flame is still going by feeling the top of the dome with your fingertips. It should be too hot to touch comfortably. If it is not, remove the dome and check the flame, relighting if necessary. After 15 minutes, rotate the cake pan to give the opposite half of the cake the proper heat exposure. Bake another 20 minutes or longer, depending on outside weather conditions. Test to see if it’s done with a stalk of grass or a clean knife.
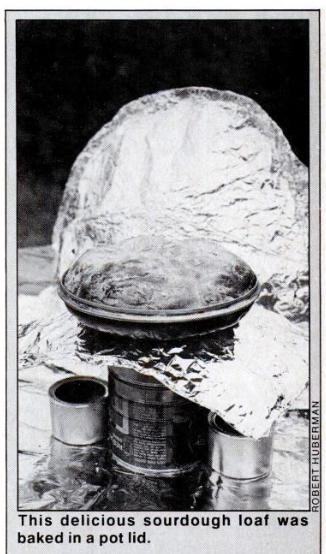
For recipes that require higher heat and faster cooking time, such as sourdough pan biscuits or rolls, a second Sterno burner can be placed opposite the first.
Fifteen minutes should do the trick, but be sure to rotate the pan halfway through the baking, or the bottoms might burn a little.
You can expect the foil dome to last through five or six foldings and repackings, but after that, it will be ready to retire and recycle. It can be squashed down to practically nothing, as can the empty aluminum Sterno cans. For longer expeditions, a spare dome could be prefolded at home, and stowed in a map pocket. The extra dome would weigh only 1.5 ounces. With a 60-second modification, you can turn the Backpacker’s Bakery oven into a useful little stove. This handy, low heat stove is essentially free—all you need to buy is the extra Sterno fuel. While it is no substitute for a standard backpacker’s stove, it can provide the camp cook with a “back burner”—a flame to set the rice on to simmer, while the main dish is cooking on the standard stove.
To convert the oven, you’ll need a can opener (the kind that punches a hole in the top of a can) and pliers. Make four evenly spaced holes along the side of the can, at the closed end. At the open end, make two side holes, opposite each other, for air vents. Use the pliers to bend the triangular shaped tabs back and forth until they break off. The open end of the can is the bottom of the stove, and the closed end is the top cooking surface.
To use the stove, nest a full Sterno can on top of an empty one, to bring the flame source up closer to the cook pot (be sure the lid is off of the empty can). On level, clear ground, set the Sterno cans down and light the fuel, quickly placing the coffee can over the Sterno. You should see flames licking out from the four top vent holes after a moment of”warming up.” If there is even a hint of wind, use a foil windscreen. This is made by folding a 30-inch sheet of heavy foil in half lengthwise, then crimping a seam to form a cylinder. This will resemble an MSR stove windscreen, which could also be used on this stove. Set the windscreen down around the stove, and it is ready for the cook pot.
To save time, bring water to boiling temperature on the main stove, then transfer it to the “back burner” once you have stirred in the ingredients. With a lid on the pot, it will simmer slowly until it is cooked. This Sterno burner can be a boon when you are cooking rice, pasta, or anything that requires a relatively long, steady simmering. In this way you free your “real” backpacker’s stove for other cooking, getting the meal done in half the time.
Burning time for the 2.6-ounce Sterno can is roughly 40 to 45 minutes. If you have partially used cans, they can be spooned into one can in order to fill it. Otherwise, follow the directions on the can for proper handling.
Baking is certainly not new to the wilderness traveler. In the North, the term “sourdough” applied to both the men who baked their bread in the far places, and to the bread itself. But old-time baking was normally done in shoveled out earth pits, cast iron Dutch ovens, or sizable reflector bakers. Now you have the opportunity to carry a very small, extremely lightweight oven into the wilderness. And an oven that can double as a stove will add versatility to any cooking outfit.
If you think about it, the ingredients for baked goods are logically suited to backpacking: They are fully dehydrated, compact, and inexpensive. When cooked, they are filling and satisfying, and provide lots of calories. But never mind logic. The first time you lift that foolish looking helmet off the pan, and find a freshly baked cake out in the middle of nowhere, you’ll see why it was worth the trouble.
—Robert Huberman
Make & Fix It: Sew Your Own Tent
From Autumn 1973
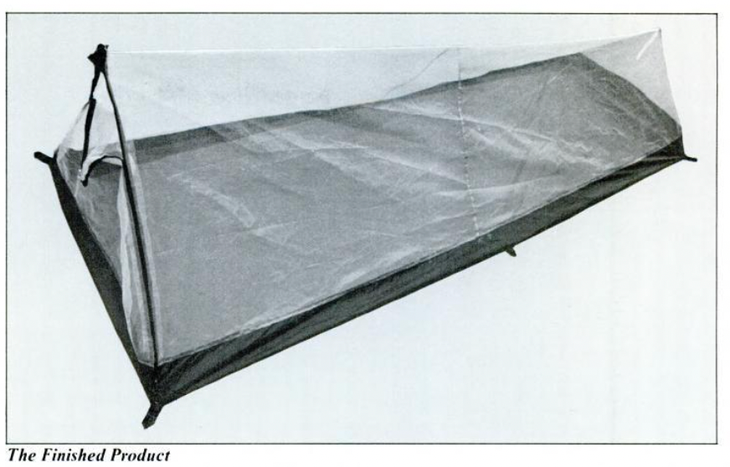
Why sew your own equipment? To save money? Well, yes and no. A better reason is the possibility that you may need equipment that isn’t commercially available. This issue’s project is just such an item: a one-person tent, and a super-light one at that. It should weigh no more than 2 pounds depending on the fabrics you use.
Some very experienced hikers refuse to carry a tent, preferring the lightweight and versatile nylon tarp when they bother to put anything between their down bags and the stars. Fine—if it suits their bodies and the climates they camp in. For myself, I always carry a tent. The New York/New England areas I hike in can have rain unpredictably in any month, and when it’s not cold enough to need a tent, the mosquitoes, flies, and no-see-ums take over all the best camping spots. A tent is also reassuring protection against small animals and things that go bump in the night.
My one-person tent is primarily designed for mild weather, but it would give at least as much protection as a tarp if things turn cold. Basically, it is a mosquito-netting tube tent with a waterproof floor. As a tube tent, it is strung to a tree at the head and to a tree or down to the ground at the foot. Alternatively, an I-pole could be improvised at the site. The tent has six stake loops. Carry stakes or improvise according to your taste. I like to carry four 1-ounce stakes.
The tube tent is protected by a waterproof fly which extends 12 inches farther at the foot and 2 feet farther at the head. The fly can be rigged on the same stakes or on separate ones (better) or even secured by cord to rocks. Plastic sheeting or your poncho can substitute for the fly, but they aren’t as efficient and the poncho must be supplemented with a piece of something waterproof to give enough length. Better to use your poncho to cover your gear, which won’t fit inside the tent with you.
Supplies needed:
- 8 square yards of nylon mosquito netting
- 3 yards of 45-inch coated nylon taffeta or ripstop for floor
- 7.5 yards of 45-inch coated nylon ripstop for fly
- ⅓ yard pack cloth for reinforcement patches
- Two 30-inch zippers
- 1.5 yards of 1/2-inch nylon tape or webbing
- 40-foot nylon (parachute) cord
- Seam sealer
- Dual Duty thread (cotton-wrap nylon)
Equipment:
- Large cutting area such as an uncarpeted floor
- Carpenters rule or several yardsticks
- Shears
- Straight pins
- Grommet kit
- Sewing machine
The list of supplies needs further comment. First, the netting comes in widths from 30 to 60 inches. Get the widest available to reduce the number of seams. Check the cutting diagram when calculating yardage for a particular width of net. Remember to allow for ¾-inch seams.
The floor fabric can be any weight from 1.9 to 3.5 ounces per square yard, depending on your preference for light weight over durability. If it’s available, the fly can be made of 1.5-ounce coated ripstop, since it is not subject to as much wear and tear. Otherwise, 1.9-ounce ripstop is fine.
Very lightweight (dress weight) nylon coil zippers are quite sufficient for this project and will help minimize weight. Unfortunately, the 30-inch length is difficult to find. Check a dressmaker’s supplier or the department store with the best sewing section. If this fails, get the lightest-weight zips at your backpacking store or mail order them.
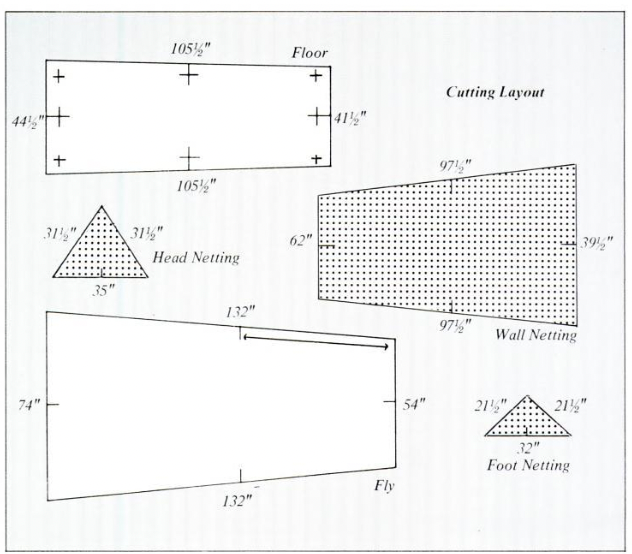
Laying out and cutting the large floor, netting, and fly pieces is best done on a large bare floor. Move furniture if necessary and vacuum or sweep. With each piece, first join edges with flat fell seam as needed to give a large enough rectangle of fabric to cut the dimensions shown. To minimize the difficulty involved in cutting such big pieces, fold the fabric in half parallel to the length with the wrong (coated) side out. Netting has no right or wrong side. Pin the selvages together in several places to prevent shifting.
Draw the indicated measurements on the fabric, remembering to divide width measurements in half because of the folded fabric. A felt-tip marker works well on the net but be careful of your floor. Cut through both layers at once. Note: All seams are ¾ wide.
Making the Tent
- Cut out floor piece, carefully following measurements. On the right (uncoated) side, mark the center of each side as shown.
- Measure in 4 ¾ inches from each edge at the corners and along side centers and draw an X at each intersection. The reinforcements and looped webbing will be sewn on at these points.
- Cut six 6-inch pieces of tape. Heat seal the cut edges. Form each into a loop and sew to a 2-by-4-inch reinforcement piece as shown.
- Sew the loops and patches to the floor at each X mark as illustrated.
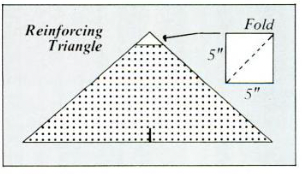
- Cut out the three netting pieces. Mark the centers. The foot triangle (the smaller of the two triangles) should be reinforced at the apex with a 5-inch square of pack cloth which is folded in half diagonally. Sew patch in place.
- Sew netting to floor along the length of one side using flat fell seam. Since the floor piece is longer, start by pinning the fabrics together at the center mark and pin in each direction. Be sure that the wider ends (head) of both pieces are together. Start first row of stitching ¾ inches from raw edges.
- After sewing one side, pin and sew the other long side. Result will be a long open-ended tube.
- Matching center marks, attach foot triangle to floor piece at the narrow end of the tube by a flat fell seam.
- Working from the inside of the tent, pin the equilateral sides of the foot to the tent body. Check by feel where one corner webbing is centered and start stitching as close to this point as possible without stitching the webbing itself. Sew up to the apex and down to the other corner webbing in one operation.

- Fold over the seam allowance and stitch again using the hem seam. Trim off the excess floor fabric at the corners.
- Fold in net edge at head of tent ¾ inch. Pin zippers in place to net. The zips must be about 1 inch apart at the tent peak. The extra zip tape beyond the teeth should be folded under. Both pull tabs are at the top of the tent when the zippers are closed, but one should face inside the tent and the other outside.
- Stitch zippers to net in one continuous seam. Remember to tack securely at start and finish.
- Reinforce apex area with 5-inch square of pack cloth folded diagonally. With zips open, stitch patch to inside of tent on the zip stitching line.
- Attach head triangle to floor by flat fell seam.
- Fold in triangle and pin in place to closed zippers. Open zips. Stitch.
- Stitch front and sides together below zips as in step 9, using plain seam. Trim off extra fabric.
- Cut out fly. Mark as shown on wrong side.
- Using 2-inch square patches, sew reinforcements 1 ¼ inches in from the edge at each corner and side marks.
- Hem fly all around with ¼-inch hem. Sew corners in box pattern as pictured.
- Attach grommets within the hem to eight areas reinforced in step 18. Attach grommets to the apex reinforcements at the head and foot of the tent.
- In well-ventilated area, apply seam sealer to insides at seams in floor and fly.
- Cut off 25-30 feet of cord and seal the ends. String through the tent, tying a lumpy knot on the insides of the head and foot grommets. When pitching the tent with the fly, string cord through the head and foot grommets of the fly. Tie knots on the tent side of the grommets to secure it and prevent rain from running down into the tent.
—Honey C Hastings