Products You May Like
You’ve got your backcountry setup dialed, you’ve checked that your avalanche safety gear (which you know how to use) is still in good working order, and you’ve been tracking weather and avy reports. Now you’re just waiting for enough snow to accumulate to make the first backcountry mission of the season viable. And you already know exactly which zone you’re going to hit first, too.
You’ve followed smart backcountry protocol to a T—almost. “Most of us have a run in mind that we want to go ski, and then we look at the avalanche report to see what it says,” explains legendary big mountain skier and AMGA-certified guide Mike Hattrup. “It’s backwards to do it that way, because it’s easy for you to manipulate what the report says to allow you to ski the run you want to ski.”
The smarter way to go about planning your backcountry mission, says Hattrup, is to have a list of run options, check the avy report on the morning of your ski day, and then go through a process of objective elimination to find the run that aligns with the given snow conditions and avalanche risks.
Use this time before winter gets underway to research all the backcountry objectives you’ve set your sights on for the season. Backcountry skiing guide books and apps like Gaia, onX Backcountry, and Fatmap are a great place to start. Hattrup recommends gathering all your beta in one “run list” that you can refer to before any backcountry adventure to help you decide which tour or zone is the smartest objective for your ski day. At a minimum, here’s what your run list should include.
Example Run List
| Name of Run | Aspect | Steepest Incline | Elevation (min.) | Elevation (max.) | Total Elevation Gain | Notes |
| Witches Woods | N | 38 | 8,400′ | 9,400′ | 1,000′ | Steep and tree’d, usually protected from the wind |
| Gnarnia Chutes | N | 38 | 9,000′ | 9,700′ | 700 | Several entrances, easiest and safest is far skier’s left |
| Alter Ego | W | 32 | 8,280′ | 9,150′ | 870 | Thicker trees up top make it difficult to find the entrance |
| Butterfield (SE Bowl) | SE | 35 | 6,780′ | 9,680′ | 2,900′ | Exposed summit |
| Galena Peak (S Bowl) | S/SW | 42 | 7,200′ | 11,112′ | 3,912′ | Depending on snow levels may be multiple descent options |
Aspect

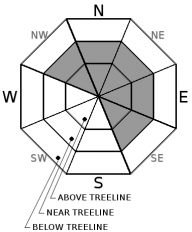
This refers to the direction the slope faces. When researching a given run, determine its aspect in the most specific terms possible, e.g. N, NW, SE, etc. All avalanche forecasts include a diagram noting the aspect predicted to carry additional avalanche risk due to weather and snow conditions. In the example diagram pictured below, the forecast calls for additional avalanche risk on NW, N, NE, E, and SE slopes near and above tree line. Avoid backcountry terrain with these aspects.
Steepest Incline

The steeper the terrain, or the higher the slope angle, the greater the avalanche risk. Most avalanches occur on slopes with an incline angle of 35 to 45 degrees, though snow can slide on any slope steeper than 30 degrees. Apps like Gaia GPS offer slope shading layers to indicate slope angle. But keep in mind that slope angle readings are not perfectly accurate, so always err on the side of caution, especially if the forecast rates avalanche danger as moderate and considerable.

Elevation (min. & max.)
Note the minimum and maximum elevation of the run. Avalanche forecasts include information about elevations that are more prone to avalanche risk and may rate elevations at or above treeline as more dangerous. Determine the run’s minimum and maximum elevation, then calculate the predicted elevation gain. It’s worth noting this separately because it’s a good indicator of how challenging your ascent may be and how long the climb might take.
Notes
Jot down anything else you know or discover about this backcountry run or zone. Things worth noting: Are there potential terrain traps, like gullies or blind roll-overs? Is the tour exposed or relatively protected from wind and weather? Is there a section that’s significantly steeper than the average slope angle? Hattrup recommends taking pictures while you’re out in the zone to help you remember important information about the terrain. Summarize these important findings in your notes section.
Find your state’s avalanche information center at avalanche.org/us-avalanche-centers/ to check your local avalanche forecast and discover accredited avalanche education courses in your area.
