Products You May Like
Get access to everything we publish when you
sign up for Outside+.
Walking on two legs is part of what enabled humans to become what we are today, freeing up our hands and expanding our fields of vision. The tradeoff is that it put additional wear and tear on our knees, leaving us more prone to injuries in those lower joints. Hike for long enough, and you’ll likely end up with a twinge, if not an injury. The solution: be proactive by strengthening your knees ahead of time with these smart, mobility-enhancing exercises from writer Emily Pennington and exercise physiologist Robyn Fog-Wiltse. —The Editors
The Circuit
Sets: 2-3 (parts 1 through 4 on each leg is a set)
Reps: 10 (each leg); complete 10 of each exercise on the left leg without stopping. Then do the right leg. That’s one set.
Rest: 0 to 90 seconds between sets (decrease as you gain strength)
Part 1: Straight Leg Lift
Strengthen the hip flexors—which help lift your upper leg —while stabilizing deep core muscles to prevent the patella from rotating and causing pain when hiking.
1. Lie on your back and bend your right knee, keeping your right foot on the ground. Extend your left leg on the ground with toes flexed up.
2. Engage your abs and lift your left leg until your knees are in line.
3. Lower your left leg, careful to keep your belly button in toward the spine, then proceed to part 2.

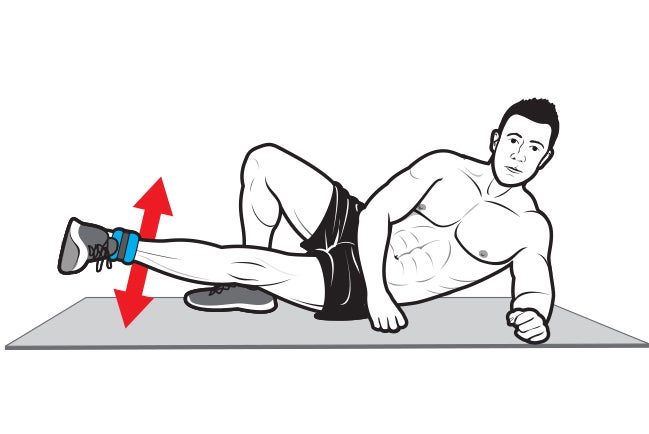
Part 2: Internal Leg Lift
This turned-out leg lift targets the inside adductor muscles, which stabilize the knee laterally to prevent buckling.
1. While still lying down, turn onto your left side, propping yourself up with your left forearm. Bend your right leg so that the right foot is planted flat on the ground behind your left knee.
2. Flex your left foot so your toes point to your face.
3. Lift your left leg about 6 inches, leading with the heel. Your right foot remains firmly on the ground. Lower it slowly and repeat, then move to part 3.

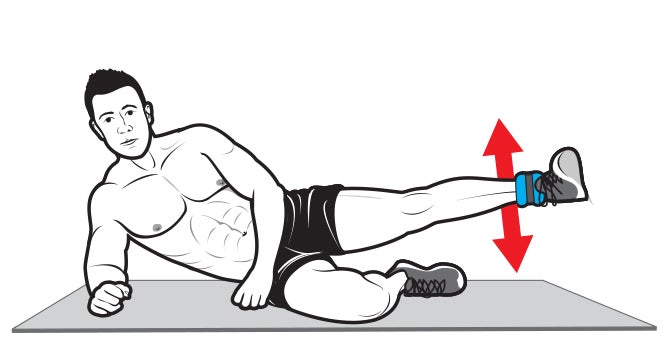
Part 3: Side Leg Lift
This outer leg raise stabilizes the knee and strengthens the gluteus medius, an essential muscle for balance on the trail.
1. Flip onto your right side, propping yourself up with your right forearm. Bend your right leg on the floor underneath your straightened left leg. Flex your left foot toward your face.
2. Keeping your abs engaged and your hips stacked, lift your left leg until it is a few inches higher than your hip. Lower and repeat, then proceed to part 4.

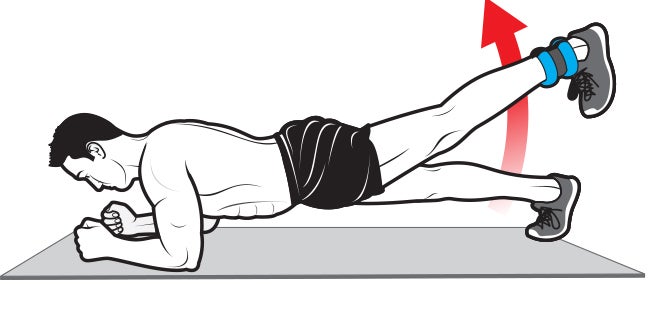
Part 4: Forearm Plank with Heel Lifts
These leg pulses strengthen your glutes, core, and hamstrings for all-around support.
1. Move into a forearm plank, keeping your abdominals engaged and your hips level.
2. Lift your left foot (keep your ankle flexed) a few inches, and pulse it up and down for 10 counts.
3. Lower the left foot then return to part 1 to repeat the entire circuit on your right leg.
The Expert
Exercise physiologist Robyn Fog-Wiltse is a former professional obstacle course racer and runs Sasquatch Training in Golden, Colorado.
Tips for Avoiding Knee Injury

While pre-emptive exercises can go a long way towards keeping you from getting injured on the trail, they’re not a foolproof solution. Make a few changes to take some of the pressure off of your joints and you’ll further decrease the chance of a hike-ending incident. —The Editors
Use trekking poles: Trekking poles can take up to 20% of the weight off your legs when used correctly, and also give you additional stability on tricky terrain, reducing the chance of an injury-causing fall.
Choose your footwear carefully: Make sure your boots or shoes have adequate cushioning and that the midsoles aren’t packed out. If you overpronate, consider adding aftermarket insoles.
Reduce your pack weight: The lighter your pack is, the less force you’ll put on your knees over the course of a backpacking trip. Invest in a lighter-weight tent, sleeping bag, sleeping pad, and/or backpack, and ask an experienced friend to do a shakedown for you.
Originally published in 2019; last updated January 2022
