Products You May Like
Huffing and puffing up inclines, struggling to keep up with hiking partners, achy muscles, and jelly legs are universal hiker experiences. They don’t have to be, though. Complete the following workout once or twice per week to prepare your body for the rigors of hiking season. If any exercises are too easy, add a bit of weight with a dumbbell or a loaded pack. Supplement this program by including some hiking-specific cardio (such as walking with a backpack or climbing stairs) every week.
The Expert: Rowan Smith is the founder of Summit Strength, an online personal training service for hikers. He helps backpackers get strong and pain-free so they can conquer every adventure.
Circuit 1
Repeat twice, no rest.
1) 20 Mini-Band Walks (each way)
This exercise will help warm up and strengthen the gluteus medius, an important muscle for hip and knee stabilization. Wrap a medium-resistance theraband or mini band just above your knees. Start with your legs about shoulder-width apart, take a small side step, and concentrate on squeezing the sides of your glutes.
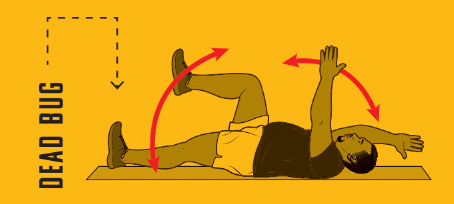
2) 45-Second Dead Bugs
This exercise is vital for anyone carrying a full pack as it strengthens the abdominals to help prevent hyperextension through the lower back. Lie down and keep your lower back pushed into the floor (don’t let it arch). Raise your arms straight up and lift your legs with your knees at 90-degree angles. Slowly lower your right arm and left leg to the floor. Raise them back to the starting position, then repeat with your left arm and right leg.
Circuit 2
Repeat three times, no rest.
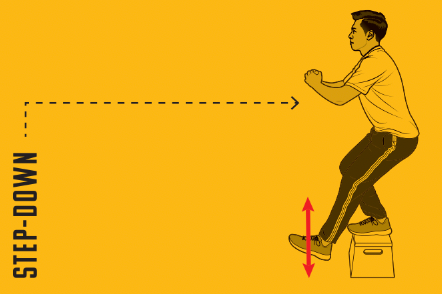
1) 10 Step-Downs (each leg)
Do these to strengthen your quadriceps and glutes and build stability through the knees and ankles to prep for steep descents. Stand on a barbell plate or low box, bend your left leg, and slowly lower your right heel to the floor. As you lower, try to push your bum backward and keep everything slow and controlled; make sure your left knee doesn’t fall inward. Return to standing and complete all repetitions on one leg before switching sides. Hold one or two trekking poles if you struggle with balance.
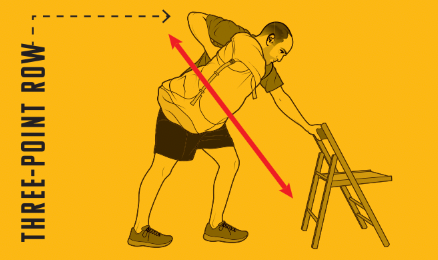
2) 15 Three-Point Rows (each arm)
This exercise helps develop muscles in the upper back. It can help maintain upper-body strength for hikers who will be carrying heavy packs. Standing with your feet about hip-width apart, lean your left arm against a chair, aiming to have your back at a relatively flat angle. In your right hand, hold a dumbbell or a weighted backpack by the top handle. Keeping your shoulder blades back and down, pull the pack handle to your right armpit. Throughout, ensure all the movement is coming from your arm and upper back.
3) 10 Single-Leg Calf Raises (each leg)
Strong calves are essential for supporting your feet, ankles, and knees—not to mention reducing that burning sensation when you climb steep hills. Stand on one foot on the edge of a step (your heel should hang over) and slowly lower your heel until you feel a stretch. Push up to your toes. Repeat all reps on one side before switching legs.
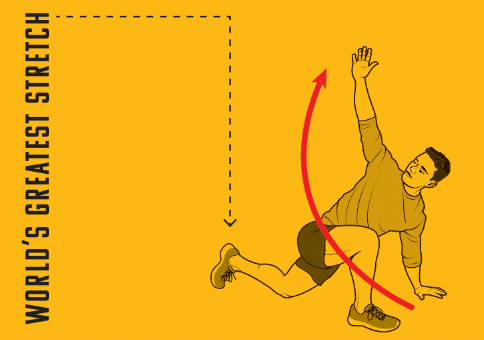
4) 10 World’s Greatest Stretches (each side)
Improving mobility in your hips and the mid-back, this move is beneficial for hikers who struggle with knee or lower-back discomfort. Start in a plank position on the floor, on your hands and toes. Place your right foot outside your right hand. Drop your left knee to the floor. Take your right hand off the ground and reach up to the sky (your torso should rotate). Slowly lower your hand and reach through the gap between your left hand and left knee. Repeat all reps on one side, and then repeat on the opposite side.
Circuit 3
Repeat three times, no rest.
1) 20 Heel-Elevated Squats
This is a terrific exercise for improving muscular endurance in your quadriceps, which can reduce leg fatigue when you tackle steeps. Place a small riser underneath your heels (such as a book), and then push your bum back into a squatting motion (you will likely notice you can get a bit deeper than a normal squat). Move in a slow, controlled manner as you lower.
2) 20 Glute Bridges
Strong glutes are important for back, hip, and knee stability. Start with your back flat on the floor, your knees raised, and your feet close to your butt. Push your hips up to the sky and focus on squeezing your glutes. At the top of the movement, try to keep your spine flat (and avoid over-arching your lower back).
When The Going Gets Tough
By Zoe Gates
- Blisters: Nothing ruins a hike faster than an open sore. Prevent blisters by breaking in your footwear before hitting the trail and applying moleskin at the first sign of rubbing. If you do get a blister, clean the area and drain it by piercing the bottom with a sterilized pin (keep one in your med kit). Cover with moleskin, a blister pad, or tape.
- Chafing: Raw, irritated skin caused by rubbing can result in misery. Avoid it by staying dry when possible and wearing well-fitting, breathable
clothing. Apply a lubricant like Body Glide on trouble spots, like the inner thighs, at the start of your hike. - Getting Hangry: Do you get needlessly snappy at your hiking partner? Snack once per hour or every two miles. Hunger makes us irritable, and a few calories can work miracles to improve morale.
- Wet Weather: If the forecast calls for rain, pack appropriately. A hardshell and rain pants will keep you cozy in a downpour. Re-waterproof your kit annually (more if you notice it wetting out). When in doubt, a shift in attitude can make all the difference—embrace nature’s many moods.
- Broken Gear: A deflated sleeping pad, collapsed tent, or torn clothes will cause suffering. Carry a repair kit stocked with duct tape, adhesive patches, a multitool, tent pole splint, and some baling wire or thick twine.
