Products You May Like
Get full access to Outside Learn, our online education hub featuring in-depth fitness, nutrition, and adventure courses and more than 2,000 instructional videos when you sign up for Outside+
Sign up for Outside+ today.
It’s easy to overlook the lacing on your hiking boots: Many of us just tighten them up, double knot, and hit the trail. But a number of common boot lacing techniques can keep your feet snug for long stretches and prevent blisters and other injuries.
The most common boot lacing technique—criss crossing, lacing up the hooks on your boot, and tying a bow knot at the top—works well for many people, but not everybody. Correct lacing is taut, but not too tight, from the toe up to the top of the boot or shoe. There should be no loose lacing and the lacing should contact the boot evenly and firmly.
Boots are mass-produced, but your feet aren’t. Proper lacing makes sure your boot is customized to you and your natural gait. Below are a few tried-and-true techniques. Use these as a starting point and experiment with your own combinations.

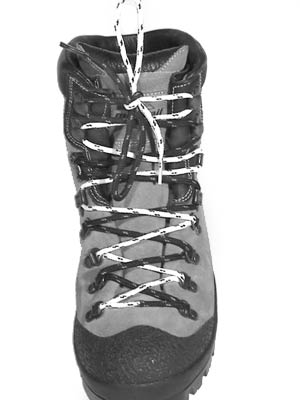
Common Boot Lacing Techniques
Refer to the image for a visual representation of each technique.
Loop: If laces are slipping on a hook, lace “down” a hook instead of “up” to create a loop around the hook. If you have low-cut shoes or running shoes, the marathon loop will do. At the top eyelet, pull the lace through from the eyelet directly below, creating a loop. Then, take the lace and bring it across the shoe, pulling it through the loop on the opposite side.
Surgeon’s knot: At the top of the instep, twist the laces around each other twice, bring up to the next eyelet or hook, and repeat. Continue this knot pattern up the boot for however many inlets that give you the most support without being too constricting. This locks the heel down and prevents the foot from moving forward in the boot more than necessary.
Overhand knot: This is most common means of locking off tension below the knot. Twist laces around each other one time before bringing the lace through the next eyelet or hook. Both the overhand and surgeon’s lacing techniques prevent unnecessary slipping in the boot.
D-ring lock: Guide the lace around through the eyelet from the top rather than from below to apply a more secure pressure on the lace.
Other Lacing Techniques
Low-Cut Shoe Heel Lock
Make a loop through the double eyelet at the top of the shoe and lace back through the loop. Pull up against the loop to snug your heel into the heel pocket. With this lock and all others, be sure to leave enough space between the laces so you aren’t cutting off circulation. The goal is to lock your foot into place, not lock off blood flow. Follow this video for instructions.

Boot Heel Lock
To distribute pressure, create a loop between two hooks and pass the lace from above and through, then continue upward. Here’s an instructional video.

Low Volume
To improve performance with low volume or narrow feet, utilize one or more of the “locking” techniques to hold the foot securely in place without causing excessive pressure or irritation. Experiment to see what feels best on your feet.

High Instep
To reduce pressure over the instep, skip crossing the laces over the sensitive area sometimes associated with having a high instep. It’s a good idea to use with a locking procedure before and after as shown here. More of a visual learner? Check out this how-to video.

Special Knot Techniques
Now that you’ve laced up your boot, it’s time to finish it all off with a neat bow. Before you put your foot in the boot to tie it, make sure the laces are slightly loosened down the boot. Forcing your foot into a tight boot puts more stress on the eyelets and wears them out faster.
Square Knot
To tie a square knot, begin with an overhand knot, take the two loops and pass “right over left, then left over right.” The finished product should have bow loops that point to the sides. For hiking and walking, this is the ideal bow positioning.

Granny Knot
This is a very common knot that is less secure than a square knot; it comes undone easily under a lot of weight or heavy movement. You know you have a granny knot when the bow loops point up and down. For the difference between a granny and square knot and how to best tie your laces, check out this video.