
Products You May Like
Heading out the door? Read this article on the new Outside+ app available now on iOS devices for members!
Download the app.
This article is part of a Women’s Running series for Women’s Health Month.
Julia “Hurricane” Hawkins, 101-year-old 100-meter dash record holder, Harriette Thompson, 92-year-old marathon finisher, Betty Lindberg, 98-year-old 5K record holder . . . what do all these famous female runners have in common? Longevity–not just in life, but also as runners! Sustainable running requires joints like hips, knees, ankles, toes, spine, and shoulders to be durable and supple.
While our minds may turn to nutrition or supplements for joint health, fueling the body is only part of the joint longevity recipe. Output, the way you move, is equally important. What if you could fine tune movements you already do to minimize joint breakdown and prolong your running joy for decades?
There’s no guarantee you can run into your 90s like those strong women, but this guide will enhance your joint movement sustainability and contribute to your longevity.
Tune-up Your Dynamic Warm-Up
Let’s start with your warm-up. Dynamic warm-ups such as arm circles and leg swings increase circulation and move muscles through increasing ranges and stretch. This gradual 5-10 minutes of easy, functional movement signals the nervous system to decrease muscle and fascia friction for the body to run like a well-oiled machine. While the heart, nervous system, muscles, and fascia are all registering the green light to go, what about the underlying joints like your toes, ankles, knees, hips, spine, and shoulders?
As the muscles warm up through increasing motion, joint compression increases. This compression is a normal biomechanical action; joint compression creates stability to support larger amounts of surrounding mobility. Like a pressurized container, healthy joints eventually need an escape through decompressive exercises.
The first 5 minutes of a dynamic warm-up routine present an ideal opportunity for decompressive joint health. Controlled articular rotations (CARS) represent the perfect joint warm-ups. CARS are controlled movements that actively work through a joint’s range of motion without being limited by muscle and fascia flexibility. They not only warm up your joints, but enhance joint nutrition, joint health, mobility, and stability.
3 CARS to Start Your Dynamic Warm-Up
While CARS can be done with any major joint, begin with the largest joints responsible for over 50 percent of your body’s mobility: Spine, shoulders, and hips.
Pick your starting position
The all-fours position provides great stability for proper joint isolation. Get on the ground in a comfortable location and place your hands directly beneath your shoulders, and your knees directly beneath your hips. Engage your core to keep your back flat like a tabletop throughout each CARS exercise. Being on hands and knees, however, is not the only position from which CARS can be performed. The sample CARS exercises can be scaled up or down by modifying the starting position to your abilities and preferences.

Scale down: If your environment is not conducive to hands and knees, or putting weight directly on your wrists or knees is bothersome, scale down. Instead of placing your hands on the floor, place them on a sturdy chair or park bench. Bend your hips and knees like you are doing a mini squat. Essentially, you are still performing a variation of the all-fours starting position with your joints elevated off the floor.

Scale up: If your superpower is core strength, scale up your blend of core stability and joint mobility by elevating your knees one inch off the ground compared to the all-fours start position. Higher is not better. Try to keep your knees elevated as you perform some, or all of the CARS exercises.
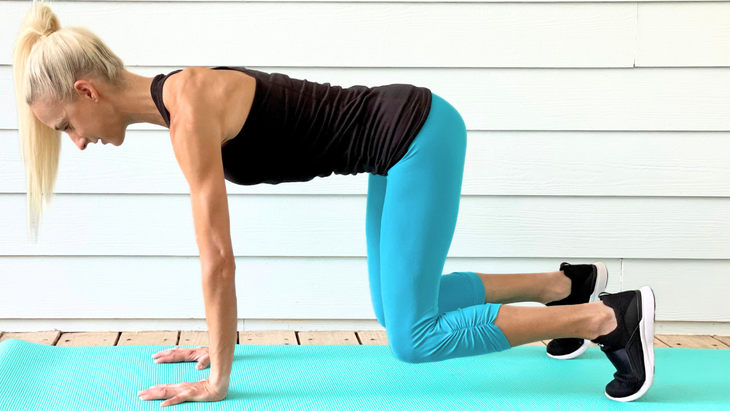
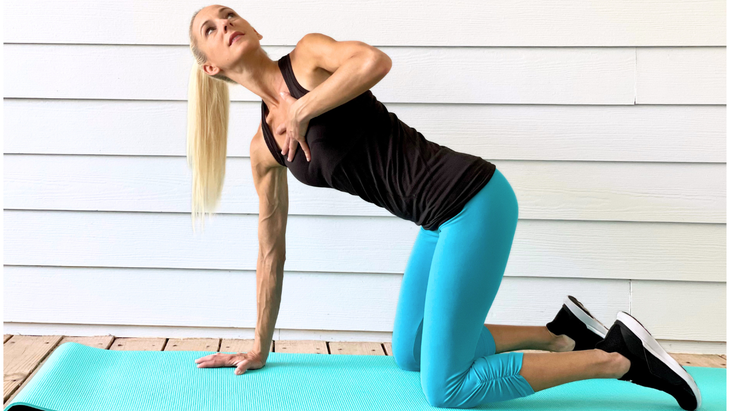
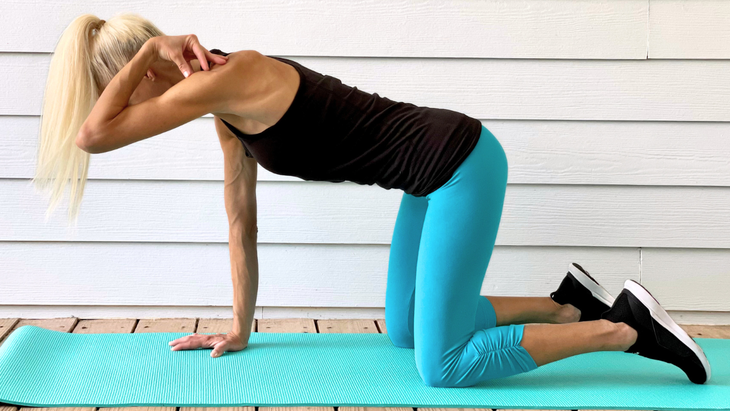
Exercise 1 – Spine CARS
- From your starting position, place your left hand on your chest. Actively press your stabilizing right hand into the ground.
- Keep your left hand on the center of your chest as you slowly rotate your chest and head to the left. Keep your neck rotating until you see the ceiling.
- Continue actively pressing your stabilizing hand into the ground as you slowly rotate your torso to the right. Try to bring your left elbow close to your right elbow. The head and eyes should follow.
- Perform 3-5 reps, trying to go a little further with each repetition. Then repeat on the other side with your right hand on your chest and your left hand as the stabilizer.
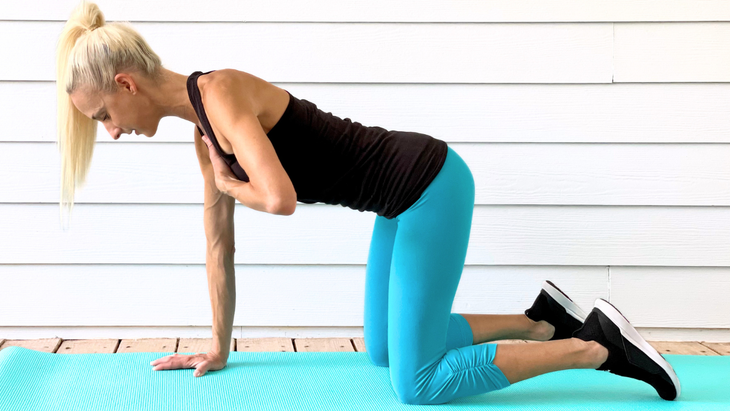
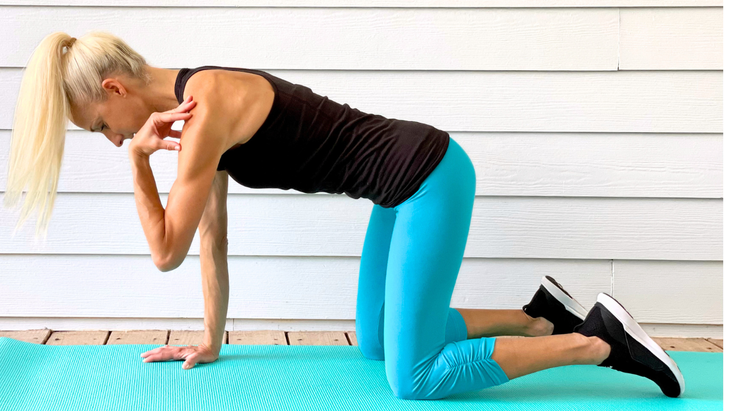
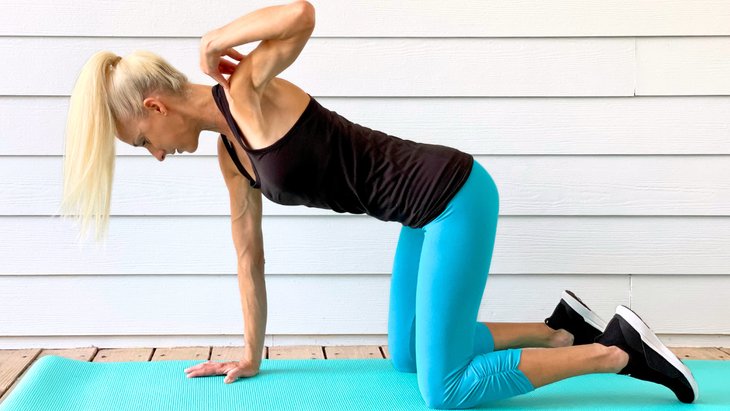
Exercise 2 – Shoulder CARS
- From your starting position, bend your left elbow to place your fingertips on your left shoulder. Actively press your right stabilizing hand into the ground. Try to keep your shoulders and hips facing directly at the ground without shifting as you perform each repetition.
- Perform shoulder circles, leading with your elbow. First, bring your left elbow upwards toward the top of your head.
- Continue the elbow-leading circle like a second hand moving around a clock face until it arrives back at the starting position.
- Repeat for 3-5 reps, being mindful to maintain the space between your ears and shoulders on both sides as you move. Repeat on the other side.
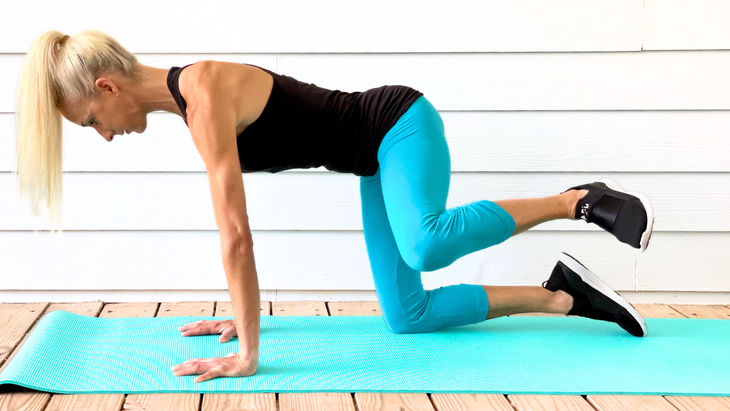
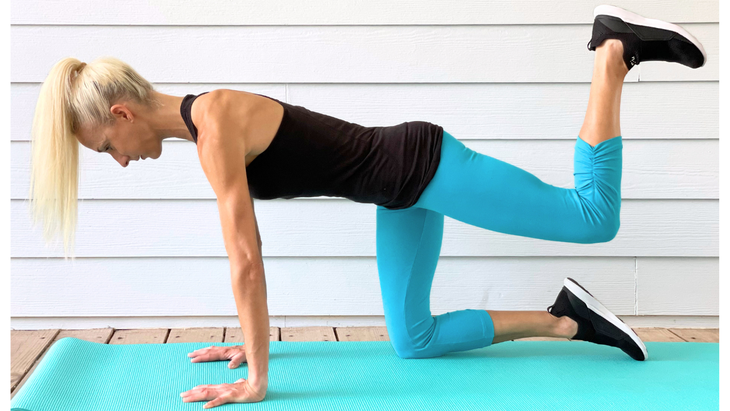
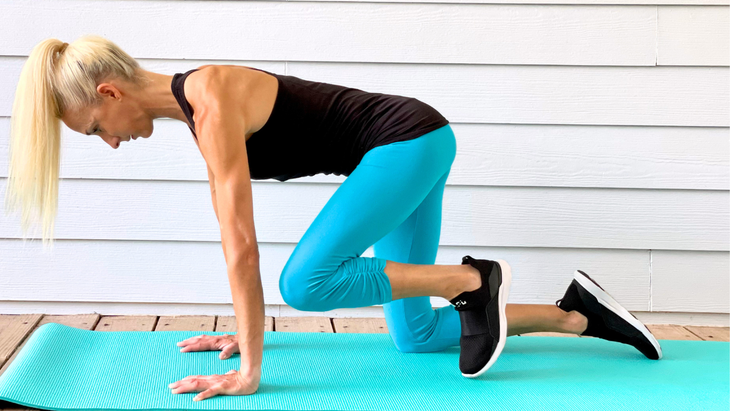
Exercise 3 – Hip CARS
- From your starting position, perform left hip circles by leading with your left knee as your right knee and two hands remain on the ground. Throughout the entire motion, keep equal weight on both arms, and keep the pelvis still. Also keep your moving knee bent to approximately 90 degrees, as if it was in a cast.
- Start by bringing your left upper thigh out toward your right side, like a hydrant exercise.
- From the side position, lead with your left knee and heel, moving up toward a glute kick-back position.
- From this elevated position, bring your left knee in toward your left elbow; only go as far as you can while maintaining a flat back.
- Repeat the hip circles for 3-5 repetitions before switching to the opposite side. The circles can also be repeated in the reverse direction.
CARS Technique Details
If your goal is joint health, details matter. Often, the details are lost in Internet videos. CARS joint health benefits, however, arise from intentional detailed movement.
Use this checklist to drive your focus with each repetition.
- Isolated joint motion: Increasing motion by shifting weight or rounding the spine leads to compensation in other joints and muscles. This compensation decreases range of motion for the target joint.
- Slow-moderate tempo: Each repetition should take 3-5 seconds. Performing CARS slowly while tuning into the subtle details allows exploration into mobility end ranges. Mindfully training the end range helps decrease injury risk factors since joints are most susceptible to accidental too-much, too-fast injuries at their end ranges.
- No momentum: Momentum bypasses the muscles’ work at the end ranges. The goal of doing CARS is not just mobility, but rather stable useful mobility to preserve joint health. Carefully working the muscles at the ends of the range builds stable joint-protective mobility.
- No external load: Adding load reduces range of motion. Since CARS effectiveness relies on exploring the edges of motion, adding load detracts from the goal.
- Quality before quantity: Every repetition should challenge the very end of the motion without allowing compensation. Quality outweighs quantity, and every millimeter gained is a win. Gaining millimeters is challenging. Every repetition should feel like effort. If you experience a sticking point or pain, mindfully work around it instead of pushing into it. If the sticking or pain points are consistent, consider seeing a medical provider such as an orthopedic doctor, physical therapist, or chiropractor to evaluate and treat the underlying cause.
RELATED: A Simple Mobility Routine for Happy Joints
Running Technique
After CARS, continue your traditional dynamic warm-up for 5-10 minutes before you start your run. There are many right ways to run. While running may seem like the same motion repeated over and over again, the truth is that running has a high amount of variability, independent of whichever techniques you subscribe to. As you run, the terrain, environmental distractions, pace, and fatigue are in constant flux. These variations can make every stride and foot contact slightly different from the next. The variations are normal and healthy for joints. Among all the techniques and variations, there is agreement on one stride scenario to avoid repeating: overstriding.
Overstriding refers to where your foot contacts the ground compared to where your knee is in space. If your initial foot contact with the ground occurs in front of your knee, this is called overstriding. Overstriding shifts a greater amount of the reactive force from the ground into your joints and tendons. While occasional overstriding to avoid obstacles or finish a race might be necessary, repetitive overstriding wears down joints and tendons as injury risks rise.
Find out if you overstride by having a friend film your feet and lower legs directly from the side as you run past, or as you run on a treadmill at your most typical pace. Freeze-frame the film the moment your foot strikes the ground. Be sure to check both your left and right foot in a few frames since your feet may do different things, or your style may be inconsistent.
Cadence Running
Cadence running is one of the fastest ways to correct overstriding. First you need to calculate your running cadence. Calculate your cadence by running at your typical pace for one minute; as you perform the one-minute run, count the number of times your right foot hits the ground. Multiple the result by two. For example, if your right foot hits the ground 60 times during your 1-minute run, your cadence is 120 steps per minute.
While research suggests 180 steps per minute as an ideal cadence, individual variations are normal. If you overstride, however, you likely need to increase your cadence.
This is easy to do. Start by downloading a free cadence running app on your smartphone. Set the app for 10 steps (or beats) per minute higher than your own cadence. On your next run, keep your feet on the beat for the first minute, then continue for 4 minutes at your previous cadence. Repeat 1 out of every 5 minutes throughout your run. Continue with your feet on the beat for 1 of every 5 running minutes for the entire week. In the subsequent training week, progress by increasing to 2 minutes on the beat out of every 5 minutes. Continue the weekly progression to 3 of 5 minutes, 4 of 5 minutes, and finally continuous feet on the beat.
Once you achieve the continuous new cadence, check your progress by re-filming and re-checking your stride. If your overstriding continues, repeat the process as you increase the cadence by another 10 beats per minute. While the process may seem slow, changing cadence and stride too much too fast is more likely to lead to new overuse injuries than to a joint health solution.
RELATED: How Understanding Flow and Clutch States Can Help Your Running
What About the Other 160 Hours in the Week?
Interestingly, the greatest opportunity to build healthy joints doesn’t occur during workouts. Consider this: How many hours per week do you spend doing something other than running? The non-fitness time presents the greatest chance to enhance your joint health. You don’t need extra minutes, equipment, or supplements to leverage this enormous opportunity. Instead, you just need to fine tune the movements you are already doing every day. Let’s walk through a day so you can give your own movements a joint health makeover.
Sleeping
What’s your favorite sleeping position? While most people change positions multiple times per night, we have favorites that we spend more time in. For runners, sleeping position greatly impacts hip, knee, ankle, foot, and spine health. Sleeping face down in positions resembling the yoga tree pose is problematic.
When face down with one knee bent, the bed creates upward force on the inner knee. This fulcrums the top of the thigh bone (femoral head) into the cartilage (labrum) on the front of the hip. The prolonged time spent in this position while sleeping begins to fray the labrum, creating unwanted instability inside the hip socket. This instability can lead to increased joint friction and pain.
The troubles don’t end there. The imbalanced tree sleeping position also creates pelvis and low back asymmetry. This can increase wear and tear on the low back and sacroiliac joints. This asymmetry can also make one leg behave functionally longer than the other, leading to increased foot, ankle, knee, and hip wear and tear on the involved side.
While changing sleeping positions may seem impossible; the change is surprisingly accessible. First, (if you are not familiar with yoga tree pose) look at a picture on the Internet to form a visual idea. Next, before you go to sleep each night say this aloud: “Don’t sleep in the yoga tree.” Soon, you will find yourself waking up every time you go to this position. Simply reposition into anything other than the face-down yoga tree pose. Adapting may take a few weeks of practice, but over time new sleeping position habits will form.
RELATED: How Much Sleep Should You Be Getting?
Sitting & driving
Now, let’s reflect on your favorite sitting positions.
- At work or in the car, do you have equal weight on both sitz bones?
- Are both knees the same distance in front of your body?
- Are both of your knees facing forward?
- Are your ears over your shoulders?
Try to achieve all of these checkpoints for your work desk and driving tasks.
Seldom do people relax in the same sitting position that they work in. Some like to curl one knee up, others like to curl both knees up. A variety of postures can be healthy. Incorporate equal opportunity for both sides by changing positions every 20 minutes. If you like to sit with your right knee curled up in the chair, after 20 minutes change to your left knee. At first the change may feel strange, but with practice your body becomes comfortable with both sides. This more symmetrical comfort not only preserves joint health, but also feeds into symmetrical running power too!
Standing
Since standing loads the lower body’s joints, there are a few more checkpoints than in sitting.
- Are you forming a foot tripod by distributing your weight between your big toe, little toe, and heel?
- Are your hips positioned over your ankles?
- Are your knees slightly relaxed (versus hyper-extended)?
- Is the front of your ribcage centered over your pelvis?
- Are your ears over your shoulders?
Like sitting, being a perfect statue would likely stiffen your joints instead of enhancing their health. Equal opportunity is still key. For example, if you like to lean into one hip, after 10-20 minutes, give the other hip an equal turn too. This equal opportunity affects the health of not just your lower body joints, but also feeds up through your entire spine into the upper body too.
Repetitive Work and Household Tasks
Whether your daily tasks include making food, typing at a computer, yard work or heavy labor, always face your work and use the largest joint available for the job. Facing your work doesn’t just mean your eyes, but also your shoulders and hips.
You can use the largest joint available for the job by bringing yourself as close to objects as you can before lifting or performing prolonged activity. As I share with my patients, “If T-Rex can’t reach it, you can’t either!” Your joints will reward you with more years to enjoy moving in ways that you love.
RELATED: 9 Tips for Running Knee Pain
Next Steps
Learning is great, but it’s better when you when you apply the knowledge you’ve gained.. Before you move away from this article:
- Bookmark it or share it on social media so you can find it again.
- Write down 1-3 actions you will take to increase your own joint longevity.
- Put your actions in your planner and make them part of your daily routine.
Then, celebrate the opportunity to enjoy sustainable running for years and decades to come.
—-
Dr. Meredith Butulis, DPT, PT, CSCS is a licensed sport and orthopedic physical therapist, certified exercise physiologist, strength and conditioning coach, personal trainer and yoga/Pilates instructor practicing since 1998. She is the creator of the ISSA Fitness Comeback Coaching Certification, author of the Mobility | Stability Equation Series & Stop Joint Wear and Tear books, and host of The Fitness Comeback Coaching podcast.
IG: Doc.MNB
Facebook: Fitness Focus Fuel